SM64-C to GS
Jump to navigation
Jump to search
Super Mario 64 C to GameShark codes Tutorial
Code
#include "n64.h"
#include "explode.h"

void _start() {
	asm volatile("la $gp, _gp");
	// Code here
}


This is our main syntax and it will always look like that!

#include "n64.h" - contains all the datatypes like u8, u16, u32 and u64 and some more.
Look here:
Code
typedef unsigned long long 		u64;
typedef unsigned int 			u32;
typedef unsigned short 			u16;
typedef unsigned char 			u8;
typedef long long 			s64;
typedef int 				s32;
typedef short 				s16;
typedef char 				s8;
typedef u32			 	size_t;
typedef float				f32;


It also contains the two macros for checking buttons and generally every controller input value.

----
#include "explode.h" - Contains the function prototypes, pointers, structs. You can extend the list yourself, but remember to always link the function prototype to the real address in SM64! To find the addresses, the function prototypes are linked to, look into mario64.x

asm volatile("la $gp, _gp"); - This ensures that the correct pointers are load. This is a MUST HAVE in every SM64 C code you write. If you miss this one, you will discover a nice and beautiful black screen.

So, let's start with coding. First, we code "again" an easy hello world print. We use PrintXY.

Looking into explode.h, shows us following:
Code
extern void  PrintXY(u16 x, u16 y, char* text);


It's really self-explanatory. u16 stands for unsigned short in C. (Again I refer to n64.h) In this case the first two parameters are for the X and Y coordinates. The third parameter is for the text. Remember, that this actually are characters.

In our code(I call it main.c), we write following:
Code
#include "n64.h"
#include "explode.h"

void _start() {
	asm volatile("la $gp, _gp");
	PrintXY(80, 80, "Hello World");
}


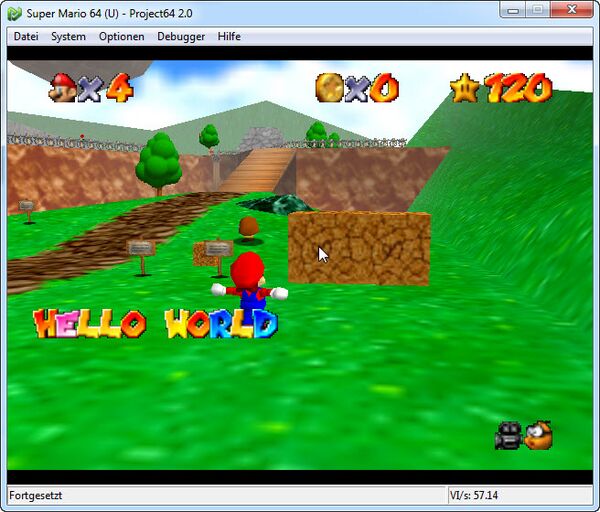
Now, go and compile your code. (Remember to change in the makefile the PRJNAME to main(if you do it like me) or to the name of your C code) You should get an output called: final.txt. I've downloaded tarek's nemucheat.exe, which directly outputs the GameShark code instead of the gameshark code for Nemu64. You can actually use this in PJ64! So, if you put it in, go into game. Your screen should now show this:
Now, we're explaining the background thing. So, what actually happens there? You see, the code is not simply disappearing. It's a loop. This is because of mario's behavior. Every time you compile your code, a short gameshark code is also added before your actual compiled gameshark code starts! The hook.txt will enlight you:
Code
812CB26C 0C10
812CB26E 0000
812CB278 1000
812CB27A 0040


This refers to mario's behavior. It's simply a:
Code
JAL 0x80400000
NOP


In case, you're wondering: The NOP is a delay slot, that's executed first and then the jump's started. Behaviors are always in a loop and always executed. And if we always jump to that RAM Address, it's obvious, that it will constantly show the hello world message. You might also have discovered, that you can change the hook to make the code interact with the behavior. Messiaen used this method, to hijack the yoshi behavior and created a custom one.

Now, let's move on and use some conditionals. We use a simple If Statement and combine it with the currentButton being pressed. (Each frame):

Code
#include "n64.h"
#include "explode.h"

MarioStruct *Mario = (void*)M64_MARIO_STRUCT;

void _start() {
	asm volatile("la $gp, _gp");
	if(Mario->pad->currentButton & D_PAD_DOWN) {
		PrintXY(80, 80, "Hello World");
	}
}


What we did here:
We called MarioStruct, and used it as name "Mario". Then we will of course need the pointer to the actual Mario Struct in-game. (It's void, of course, cause the game fills in the restly part)

Now, in our code we can refer to Mario through "Mario->pad->currentButton & D_PAD_DOWN"

So, the "D_PAD_DOWN" comes from n64.h, just saying. So, if we hold currentButton pressed respectively press it one time, it will output Hello World. Remember, that "currentButton" is each frame. There's also a less spammy method, like previousButton. It checks for the last frame you pressed the button. This would be however more useful when spawning objects. You see, it's a really easy thing and not really complicated.

But there are few things to remember:
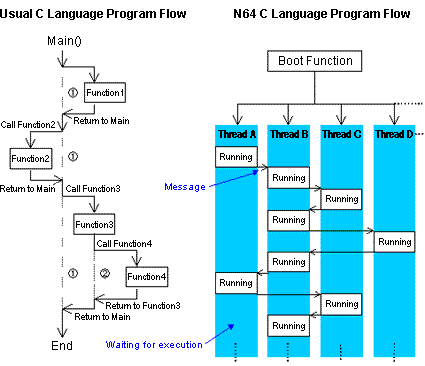
N64 does NOT have a real main() function. Even if it looks like that, it actually starts from a boot function, that's specified in the spec file. We're simply a thread. And N64 likes to process threads parallel to eachother.
So, now let's do something better. If-Statements are completely retarded and so we use switch statements. They're better over viewable and it's simply shorter than some fucked up if statements.

Let's do something interesting. If Mario has a "constant" amount of coins, different messages will appear. For this, we take Mario struct and the "coin" member.

The code:
Code
#include "n64.h"
#include "explode.h"

MarioStruct *Mario = (void*)M64_MARIO_STRUCT;

void _start() {
	asm volatile("la $gp, _gp");
	switch(Mario->coins)
	{

	case 10:
		PrintXY(80, 80, "1, 2, 3");
		break;
	case 15:
		PrintXY(80, 80, "Oh Hi");
		break;
	case 20:
		PrintXY(80, 80, "Lollol");
		break;
	case 25:
		PrintXY(80, 80, "Noodle");
		break;
	default:
		PrintXY(80, 80, "Default Msg");
		break;
	}
}


Remember, that the code checks now if you EXACTLY have that coin amount! If you go over 10 (until 15), it will show the default message again, until you get another case (15, 20, 25). If you want to check for values that are greater and equal to that specific value, you better use an If-Statement.

Practice.
Now, let's do a very simple shop. By subtracting an amount of your coins. We use this time, If-Statements again.

Code
#include "n64.h"
#include "explode.h"

MarioStruct *Mario = (void*)M64_MARIO_STRUCT;
Object **Obj = (void*)M64_CURR_OBJ_PTR;

void _start() {
	asm volatile("la $gp, _gp");
	PrintInt(20, 20, "Coin Container %d", Mario->coins);
	if(Mario->pad->previousButton & BUTTON_D_DOWN)
	{
		if(Mario->coins >= 10)
		{
		Mario->coins -= 10;
		Object *NewObject = SpawnObj( (*Obj), 0x00D4, 0x13004148);
		}
	}
	if(Mario->pad->previousButton & BUTTON_D_UP)
	{
		Mario->coins += 10;
	}
}


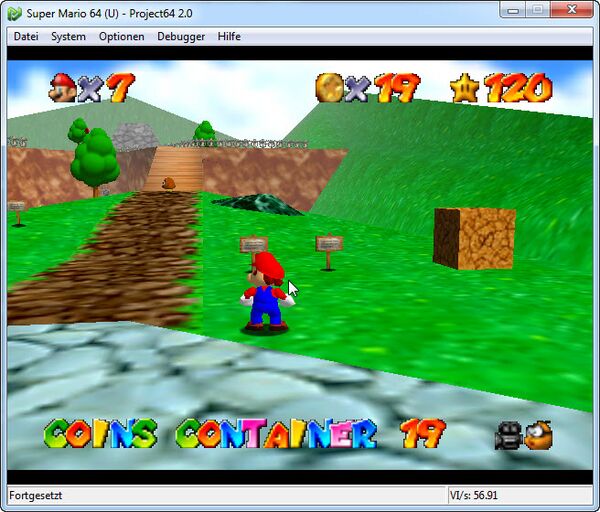
We've put up a Coin Container, showing the "current" value of mario's coins. I know, it's useless you think. But I show you, what I mean. So, now if we have 10 coins or more, 10 coins will be subtracted from mario's coin value. My current coin value:
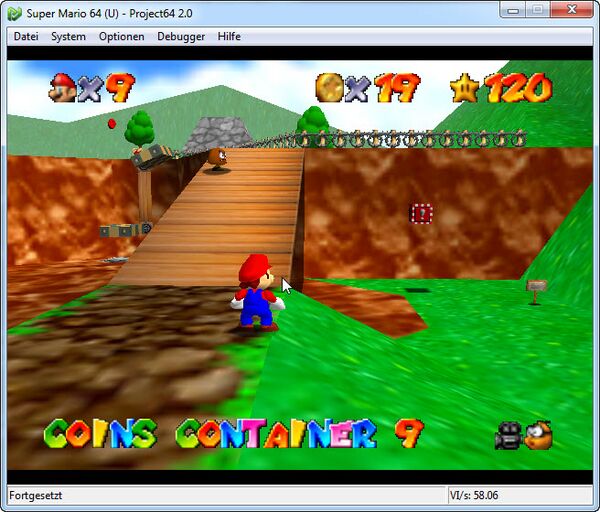
Now we press D-Pad Down and we see, we've got a mushroom! But there's a little problem. After we bought it, following happened:
While the real coin value should be "9" (down), the original coin value still shows 19! If we now collect 19 coins again and then another again, it will update. This means, on subtraction the coin value doesn't update. That's a bad problem. I'm not really into the problem yet and don't know a way around this. Lazy Cow, I know. Maybe someone else finds it out. To fix this (thanks Kazeshin) you will need to edit in the actual display list. Of course, you see the actual coin value HAS changed, but the display list didn't update the displayed character to show the current coin value. So, go to hook.txt and put under the other codes following code:
Code
812E37E0 84E7
812E37E2 B218


This should fix our little problem. It actually doesn't fix the "coin sound" being gone, but it doesn't matter. You can fix it yourself, of course.


